

There is an updated version of this post here.

This Post may contain affiliated links, clicking on those links do not cost you a penny, unless you make a purchase in wich case i may get a small comission at no extra cost to you! However i never recommend yarn or products i dont actualy like myself

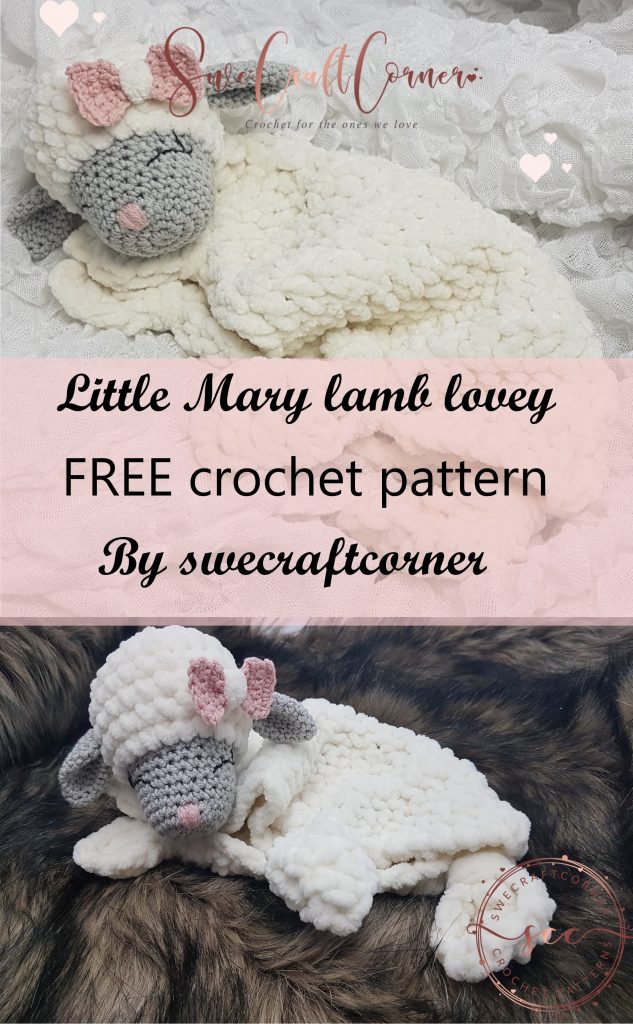
Little mary lamb pattern series has been released!


This is the perfect lovey for a precious little baby.
This lovey is croched with a cuddly yarn called Smudge from a brand named Sirdar, it is so cosy and easy to work with.
I have combined it with a cotton yarn from katia called cotton-stretch that can be found here.
You can find the yarns i have used if you want to check it out!
However any cuddly yarn and cotton yarn that matches the hook size required for this pattern can be used.
Dont miss my shop where you can buy the printable version of my FREE patterns without ads , you can find it here
have you seen my super cosy huge bunny pattern? If not make sure to look at that too!
I hope the little one that recives your lamb lovey made with love will have a friend for many years!
Before we start i want to thank you all for all the love, shares and pins on my over the knee socks! That makes me want to give you so many more pattern totally FREE! I would love it if your shared this link also!
And I would love a follow!
And also make sure you do not miss my newest FREE pattern here!
This pattern is copyright protected and the property of swecraftcorner and may not be reproduced, sold, copied or altered in any shape or form, please respect this, Of course you can share the link directly. You may sell finished item that you made with this pattern as long as you credit me for design and include a link back to my webpage. www.swecraftcorner.com
You may not use my pictures when selling your finished item.
If you love the pattern please share the link with your friends, I would be so happy if you did!
Please note! it has come to my attention that some people have been taking advantedge of the fact that i am offering some of my patterns free. Or just using my pictures for clickbait- I am trying to get in touch with theese sites/persons and until i can get them to stop distributing my patterns. I hope you show your support for me as a small designer by sharing this post or buying a pdf version of some of my patterns!
Always show support to the small designers offering free patterns, this might be their dream and they will probably do a whole lot more free patterns if they get shared on social media like pinterest and facebook, so they can see that you love their work and appriciate that they share it with you!
https://www.etsy.com/shop/SweCraftCorner/
You will need:
Yarn: Chenille yarn approx 80m, cotton yarn approx 20-30m, scrap yarn for the bow, eyes and nose
Hook: 3,0mm to use with chenille yarn for face, ears and bow
5,0mm for the head
6,0mm for the “body”
Stitch marker
Scissors
Needle
Stitches used:
Magic ring – mr
Slip stitch – sl st
Chain – ch
Single crochet – sc
Double crochet – dc
Stitch/stitches – st/sts
sc2tog – hook into first st, pull yarn through, hook into next st, pull yarn through, yarn over and through all loops on hook
Dont quite know how to crochet? Look at my crochet school here
Pattern info: Stitches are separated with, when a series of stitches are repeated these are within * – * And the total number of times the series of stitches is repeated is written after. On each round of the head when making the first st, place a marker in that stitch so you know where your round begins and ends
Head:
Start with cotton yarn and 3,0mm crochet hook, make a magic ring, tutorial on how here
R1: 6 sc into mr (6)
R2: 2sc in each st (12)
R3: *2sc, 1 sc in next st* x6 (18)
R4: 1 sc in each st (18)
R5: *2sc, 1 sc in 2 sts* x6 (24)
R6-10: 1 sc in each st (24)
R11: 1 sc in each st until last st, sl st into last st
Change to the chenille yarn and hook size 5,0mm
R12: Fasten the yarn in same st as last rounds sl st, 1 sc in same st, and each st round. (24)
R13-15: 1 sc in each st
R16: *sc2tog, 1sc in 2 sts* x6 (18)
R17: *sc2tog, 1sc* x6 (12)
Stuff the head
R18: *sc2tog* x6 (6)
Ears: Make 2
With cotton yarn and hook 3,0mm, make a magic ring
R1: 4 sc in mr (4)
R2: * 2sc in 1 st, 1sc in 1 st* x2 (6)
R3: *2sc in 1 st, 1sc in 2 sts* x2 (8)
R4: *2sc in 1 st, 1sc in 3 sts* x2 (10)
R5: *2sc in 1 st, 1sc in 4 sts* x2 (12)
R6: *2sc in 1 st, 1sc in 5 sts* x2 (14)
R7-10: 1 sc in each st (14)
Fold the ear two times: first flatten the ear counts as one fold, then fold the ear side to side and sew onto the head
Bow:
With scrap yarn and hook 3,0mm
Ch 6,
R1: Into second ch fron hook, make 1 sc, then 1 sc in each st across (5) ch 1, turn
R2-10: 1 sc in each st (5), ch 1, turn
Fasten off Use cuddle yarn to wrap around the bow and sew onto head.
Body:
With chenille yarn and hook 6,0mm
Ch 26,
R1: In third ch from hook, make 1 dc in each ch across (24), ch 2, turn
R2-15: 1dc in each st, ch 2 turn
Fasten of, weave in ends.
Measure where you want your head to be, sew it securely onto one of the short sides of the body
wrap yarn round each corner to make hands and feet, fasten the yarn extremely well, it needs to stay in place for any potential wash
Hope you love what you have made! Please hashtag #swecraftcorner when posting pictures of your amazing work online!
And dont forgett to pin it to your pinterest and follow me <3


